Strava: How to read your phone workouts: core metrics, segments and privacy
Strava can make a simple run or ride feel “measurable”, but the numbers are only useful if you know what they actually represent. On a phone, the app is usually relying on GPS and a mix of sensors (yours and your device’s), so some metrics are precise, some are estimates, and some are easy to misread when you’re tired, excited, or chasing a personal best. This guide breaks down pace, heart rate, elevation gain and segment results in plain terms, so you can train smarter rather than harder.
Core metrics on mobile: pace, heart rate and elevation without the stress
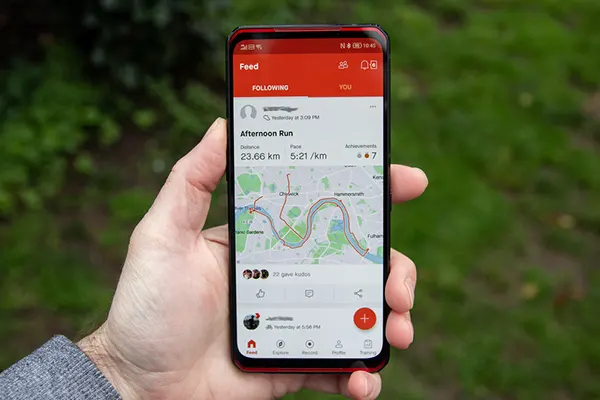
Start with pace and speed, because they’re the easiest to overvalue. Your pace is simply how long you took to cover a kilometre (or mile), but on a phone it’s calculated from GPS points. That means it can wobble under trees, between tall buildings, or when your phone loses signal. If you see sudden spikes, don’t panic: look at the average pace for the whole interval, and compare it with how the effort felt. A steady “feel” with a messy graph is often just GPS noise, not a real performance drop.
Heart rate is more personal than pace. A fast day for one runner can be a recovery jog for another, and that’s why heart rate zones matter more than one-off numbers. If your heart rate rises steadily at the same pace, it can signal heat, dehydration, lack of sleep, or accumulated fatigue. If it stays unusually high on an easy day, that can be your cue to back off rather than “push through”. The practical rule is simple: use heart rate to keep easy days genuinely easy, not to turn every session into a test.
Elevation gain looks authoritative, but it’s an estimate unless you have very reliable data. Phones may combine GPS elevation with map data, and small errors add up over long routes. If you run a flat loop and Strava shows a surprising amount of climbing, treat it as a sign of data smoothing rather than a mystery hill you somehow missed. The useful part is direction, not perfection: if the same route consistently shows more gain this month than last month, it can reflect changes in recording quality, not your fitness.
How not to overtrain because the numbers look “bad”
Strava can nudge you into chasing consistency at the expense of recovery. A streak, a weekly distance total, or a pace chart can be motivating, but it can also push you into turning a sore day into a “just one more easy run” day. If you’re building fitness, recovery is part of the plan, not the gap between plans. When you feel the temptation to fix a slow pace with extra effort, pause and ask a better question: “Was today meant to be hard?” If not, you’ve already succeeded by showing up and keeping it controlled.
Use a simple three-point check after each session: effort (easy/moderate/hard), breathing (can you talk in full sentences?), and soreness (does anything feel sharper than normal fatigue?). If two of these say “hard” on a day that was meant to be easy, treat the data as a warning light. In that situation, the correct response is rarely “run faster”; it’s more often “sleep more”, “eat properly”, or “take a rest day”. This is how you get fitter over months, not just faster in one workout.
Finally, remember that metrics are context-dependent. A 5:00/km pace can be relaxed on a cool day and brutal in heat; the same heart rate can mean different things depending on caffeine, stress, or hydration. The healthiest Strava habit is to compare like with like: same route, similar weather, similar intent. That comparison is far more informative than trying to match someone else’s numbers or forcing your training to look tidy in a feed.
Segments on your phone: what leaderboards really measure
Segments are Strava’s most competitive feature: a defined stretch of road or trail where your time is matched to others who passed through the same start and finish. On mobile, you’ll usually notice segment results after the workout, when Strava analyses your GPS trace and checks whether you covered that exact line. This is why a segment time can sometimes look odd: a tiny GPS shift can change where the app thinks you entered or exited the segment, especially on twisty paths or dense city streets.
Leaderboards are best treated as “best effort under these recording conditions”, not as scientific truth. Wind, traffic lights, trail congestion, and GPS accuracy all influence results. Two people can run the same segment equally well and still record different times because one phone captured cleaner data. If you want segments to be useful for training, pick a small number of them and repeat them occasionally under similar conditions, rather than hunting for new ones every week.
It also helps to understand what a segment does not measure. It doesn’t know your intent, your fatigue level, or whether you were weaving around pedestrians. It doesn’t account for a hill that feels harder after heavy training, or a headwind that turns a steady effort into a grind. If your segment time worsens while your overall training is improving, it can simply mean you trained sensibly and didn’t burn yourself for a single number.
Trust in segment rankings: mistakes, fake activities and what Strava does about it
Not every suspicious leaderboard time is “someone cheating”. A very common cause is miscategorised activity types, such as a motor-assisted ride recorded as a standard ride, or a run accidentally saved as a ride. Another frequent issue is leaving recording running in a car after training, which can create an impossible “effort” that lands on leaderboards. These aren’t rare edge cases; they’re the everyday ways leaderboards get polluted when tracking is easy and phones are always in pockets.
Strava gives the community tools to protect leaderboard integrity. You can flag activities that clearly shouldn’t appear, and Strava’s guidelines focus heavily on using the correct activity type and removing inaccurate data. This matters because a leaderboard is only as credible as the data feeding it. If you care about segments, it’s worth knowing how to report questionable results and how to fix your own activity if you realise you recorded the wrong sport or left tracking on by mistake.
Beyond manual reporting, Strava has been using automated detection to stop vehicle-recorded activities from appearing on run and ride leaderboards, and it has also run large-scale clean-ups that remove anomalous uploads. The point isn’t to make leaderboards perfect; it’s to keep them credible enough that a “top 10” means something. As a user, you can help by categorising workouts correctly, cropping obvious errors, and treating extreme results with healthy scepticism until the data checks out.
Route privacy on Strava: sharing safely without giving away your routine
Route privacy is not only about hiding your home address; it’s about not publishing patterns. If your runs start at the same time every morning from the same street, a full public map can reveal more than you intended. The good news is that Strava’s privacy controls are detailed enough to keep your training shareable while removing the most sensitive parts. The key is to set defaults, so you don’t have to remember to adjust every activity when you’re tired.
Map visibility settings let you hide the start and end of activities or hide the entire map. You can also set a privacy zone around a specific address and choose a radius, so the beginning and end of routes near that location are automatically hidden. This is especially useful if you run from home, work, or a regular meeting point. Once set up, it reduces the risk of accidentally posting a route that pinpoints your routine.
Privacy goes beyond maps. Strava also has controls for who can see your activities, whether group activities are shown, and whether features like Flyby can appear on your workouts. A sensible baseline for most people is: keep detailed activities to followers, hide start/end points, and only open up “Everyone” visibility for specific events you’re happy to share widely. That way you stay connected with friends without turning your training log into a location diary.
Flyby, visibility defaults and a quick 2-minute privacy checklist
Flyby is a replay feature that can show athletes who were near each other during activities. Strava has made Flyby sharing opt-in, and it only appears when both your activity visibility and your Flyby setting allow it. In practice, that means you can keep Flyby unavailable to others without losing your normal Strava usage. If you didn’t intentionally turn it on, it’s worth checking the setting once and then forgetting about it.
Start with defaults. Strava’s documentation notes that new accounts can hide a short distance at the start and end of future activity maps by default once you are logged in, but you shouldn’t rely on defaults alone if privacy matters to you. Set your preferred map visibility and your preferred audience (for example, followers) as your standard. Defaults are there for convenience, but your routine and your comfort level decide what “safe” means.
Here’s a simple checklist you can do on your phone: (1) set map visibility to hide start and end points, (2) add a privacy zone for home (and work if relevant), (3) set activity visibility to followers unless you have a reason to share publicly, and (4) check Flyby controls and leave them off unless you actively want the feature. Once these are set, you can still use Strava for training insight and community, while reducing the chance that your routes reveal where you live or when you’re usually out.